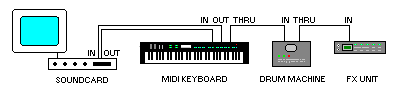
Midi Application
MIDI connections for a sequencer to drive a drum machine through a synth and effects processor.
Midi Recording to Reel Tape
Connect the tape sync output of the sequencer (or computer interface) to the tape recorders sync channel. This is an outside track (track 4 of a four track tape). Connect the sync tracks output to the tape sync input of the sequencer or interface.
Recording the Sync Tone
-
Clean and demagnetise the tape heads.
Start playing the sequence.
Set the recording level of the sync tone.
Usually around -4 Vu for correct syncronization on playback.
Tape sync works best if the track is recorded before anything else.
Start the tape recorder in record mode. A few seconds
later start the sequence. It will be now striping the FSK or SMPTE on tape.
Connections for an intergrated sequencing / digital audio system
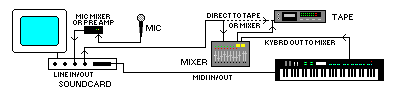
In addition to a personal computer, MIDI interface, and MIDI controller requirements are:
-
A direct to disk recording card that plugs in to the computer.
The card converts audio onto a hard disk drive.
MIDI/DIGITAL audio recording software.
A high capacity hard disk drive for temporary storage of audio data.
(One track of one minute of CD quality audio consumes about 5M,
so a 600M drive could record 30 minutes of 4 tracks, or 1 hr of stereo).
A DAT or tape for recording.
Operating Procedures
-
Play the DAT mixdown master and record it on to hard disk.
This might be just one song or an entire album.
The wave form of the audio program appears on the monitor
screen at any desired level of resolution.
Zoom out to see the whole program, or zoom in to see individual samples.
Using a mouse, define regions or zones in the audio waveform.
These are sections of the program, such as an entire song,
the chorus of a song, a drum riff, or a vocal lick.
Edit the program by manipulating the regions, ie.trim the
start and end of each region, move them around, copy, insert silences,
and resequence the songs so that they run in any desired order.
Once the program is edited copy onto DAT. During this process,
the software plays the program, which tells the hard disk where on the
disk to read the data from.
The finished DAT is a CD master which can be used to cut a
compact disk.
FUNCTIONS
Cut and paste : move sections and place somewhere else.
Copy : Duplicate a section (a chorus etc)
Crossfade : Fade out of one song while fading into another.
Slip : Move a section in time, either within or across tracks, or adjust the start times of sound effects by moving them on screen.
Scrub : Play the program slowly forward or backwards. (Similar to rocking a tape reel)
Trim : Remove or truncate unwanted portions of the waveform or program.
Playlist : A list of the selections in the order desired (they can be reordered instantly and might be entire songs or parts of songs or sound effects).
DSP (Digital Signal Processing) : Digital control of mixing, volume, panning, equalisation, chorus, limiting, looping, compression, expansion, noise removal and noise gating.
Time Compression/Expansion : Makes a program shorter or longer without changing its pitch.
Automated Mixing : Computer remembers mix moves and sets controls during mixdown.
Spectrum Analysis : A display of level versus frequency of the audio program as it progresses in time.
Midi Sequencer : Lets you import or record several tracks of MIDI.
Sync : Synchronisation to SMPTE time code or MIDI Time Code.
PQ Editing : Allows you to add song start and stop times and index points to create a premaster tape for Compact Disk.
back to top